| 1.0 Welcome |
HTML Basics |
| 2.0 Introducing HTML |
| 2.1 Page Layout |
| 2.2 HTML Files |
| 2.3 Text Formatting |
| 2.4 Lists & Extras |
| 2.5 Inlining Images |
Linking to Stuff |
| 3.0 Introduction |
| 3.1 Internal Links |
| 3.2 External Links |
| 3.3 Hot Links |
| 3.4 Image Maps |
Advanced HTML |
| 4.0 Tables |
| 5.0 Frames |
| 6.0 Forms |
Publishing Your Site |
| 7.0 Publishing |
| 7.1 Site Hosting |
| 7.2 FTP |
Appendix |
| Golden Rules |
| Color Codes |
| Typefaces |
| Escape Sequences |
Printable Version (pdf) |
Main Site:  |
So, do you want to add a bit more structure to your page? Use a table...
Tables are the most fundamental building-block of an HTML page from a design perspective (as opposed to a coding perspective). They are used to position areas of a page, design things like photo galleries and all sorts of things. This page has a table on the left - the menu - and a table here where I am now typing and there is also a table (the "psychadelic table" example) just below. In fact, all these tables are themselves encased in a kind of master table that tells how the menu, main page with this text, etc, should be displayed on the page. These tables within tables are termed "nested" tables. However, none of this matters from a coding point of view because all tables are coded using the exact same basic tags and attributes.
If you want to learn to hand-code HTML to build a "bespoke" site or page rather than a "templatey" one - I am sorry, but you need to get to grips with tables! Now these guys can often appear daunting for the uninitiated - but they really ain't....but you need to get rid of your suspicions first and have faith in me! All you need to do is learn to "understand" exactly what each bit of code does (i.e. build a model of it all in your mind) then your problems will be over! I will try to guide you through using simple examples upon which you can build even more complex ones as you become more accomplished with "modelling" ideas in your head.
...or you can of course just use an HTML editor to do it, but where would the fun be in that?!
Without further ado, I am going to jump straight in and show you a table and its code:
Example Table
So, here is my table which will be referred to as the "psychadelic table" throughout this section!
 |
 Aligned top and centered |
 |
 |
 |
 |
| Click the above to enlarge this thumbnail | Couldn't think what to stuff in here! | |
 This is getting to be a pretty psychadelic table! |
||
 |
 |
 |
So what is the code behind all the above?
What does all that code do?
1. The TABLE Attribute
Look at the first line (in fact it is line 140) in the screenshot of the code above - I have repeated it below for convenience:
<TABLE ALIGN="center" BORDER="3" BGCOLOR="#000000" CELLPADDING="4" CELLSPACING="4">
That is the bit of code that sets the table within your page. Below are the attributes and what they mean:
ALIGN="....": Tells the browser to horizontally align the contents of the table to the center of the page. The variables are "left" (default), "center" or "right" - as you can see, I have chosen to center the table.BORDER="X": If set, this will give each cell in the table a border around it of a pixel width you define - as you can see I have chosen a pixel width of "3" for this table. It is possible to specify the border colour but we will look at that later.BGCOLOR="#xxxxxx": Uses the hexdec. colour system (see appendix for colour chart) as we have discussed earlier. Putting a colour code within theTABLEelement sets the default background colour for the table. The reason I emphasise default here is that it means that for any cell (see later for what that means) that you don't specify a colour for, the colour of that cell will be what you set in theTABLEelement - in this example that would be black, since#000000is the hexdec. code for black!CELLPADDING="x"..: This simply sets the pixel distance you want around each item within each cell (see later for what "cell" means) in the table. I often use a value of "4" for this as it gives e.g. photo thumbnails a nice border around them.CELLSPACING="x"..: Often confused with the above, this specifies the amount of space that actually divides each cell as opposed to the space within each cell. You need to be careful with this one because if you have set theBORDERattribute, each line that makes up the border around cells will in effect have a gap between it and it's neighbouring cell's border. If I am using borders, I frequently set the cellspacing to "0" otherwise it can look messy. Experiment and you'll see what I mean!
Before we move on, note the code in the screenshot above - look at the very bottom at line 177 and you'll see there is a closing tag /TABLE>. All
tables, like most HTML, have to have this closing tag otherwise at worst your table won't display properly on any browser, or at best some browsers won't display it properly (these days
a lot of browsers are very patient with bad coding, so you may find that certain tables do display even if there is no closing table tag, but you will likely get unpredictable results!
2. What are these "Cell" thingies I was talking about?
A cell is simply the basic unit of a table. Imagine a spreadsheet, eg. Excel. A spreadsheet has rows and it also has cells. A table is no different - it consists of rows and within each row a number of cells (and you can specify how many of each you want). Check out the below and compare it with the code screenshot above:
<TABLE> we just looked at that one above.
<TR> means table row 1.
<TD> means cell 1, in row 1. You close the cell with </TD>
<TD> means cell 2, in row 1. Again you close the cell formatting with </TD>
</TR> is the end tag indicating the end of row 1.
<TR> means the start of row 2.
<TD> means cell 1, in row 2. You close the cell formatting with </TD>
<TD> means cell 2, in row 2. You close the cell, as above.
</TR> is the end tag indicating the end of row 2.
</TABLE> must always be here to show the end os the table!
So the above is a very basic table that shows all the basic attributes you need to buid a table. Trouble is, using just this code above won't do much!
The whole point of a table is to use it to display stuff and to do that you need to insert the "stuff" within the <TD> and </TD>
tags. Have a look at the code screenshot earlier and you will see that various things, e.g. images and links, all appear between <TD> and </TD> tags.
However, first there are various nifty things you can do within the <TR> AND <TD> elements. Have a look at the
second <TD> tag in the code screenshot earlier - which I replicate below...
<TD HEIGHT="120" WIDTH="120" VALIGN="top" ALIGN="center" style="font-size: 8pt; color:#ffffff;">
...and here is what the code means:
HEIGHT="....": You don't have to set this as the cell will usually size its height from the contents. However, in some browsers this may not work so it is always worth setting the height in your cells. Here I have set it to 120 pixels (the pixels bit is assumed so you don't have to type "px" after the number).WIDTH="....": Similarly to the above, you don't have to set this but I always tend to. You can also set the width in the<TABLE>element itself. However, doing this will make the browser assume that all cells should have an equal width that adds up to the total width specifed in the<TABLE>element. This is fine if you want all the cells to be the same, but not fine otherwise! Since I have not set the width in my table element in the example table above, I chose to set it in my cells. However, note from the code screenshot earlier that I only set the cell width for each cell in the first row only. This is because the width of all cells in the next rows are assumed to have the same width of what was set in the cells in the first row. If you think about it, that's entirely logical! Now the issue of width is a bit of a hairy issue in itself so I have devoted a section further down about this.VALIGN="....": Tells the browser how to verticall align the contents of the cell. In this example I have chosen to valign top but you could align "middle" (note, not center as that won't work) or "bottom". If you look back at the second cell on row one of the actual psychadelic table earlier, you'll see what my use of valign top has done to the image there.ALIGN="....": Tells the browser how to horizontally align the contents of the cell. In this example, I have chosen to align centre, but you could align "left" or "right". If you look back at the second cell on row one of the actual psychadelic table earlier, you'll see what this does by the notes I have put there.BGCOLOR="#xxxxxx": Though my example does not use this, you can use this within your<TD>element just like you can in the<TABLE>element. If you don't set this in your<TD>tags then any you have not set the bgcolour for will take the default colour - which is that you specified if you used this tag in the main<TABLE>element at the start of the table - - in my example that would be black, since#000000is the hexdec. code for black! Indeed, if you look at the actual psychadelic table itself, you will see that cell 2 of row 1 does indeed have a black background.style="font-size: 8pt; color:#ffffff;": Ahah, now this one should have got you intrigued. It is not HTML at all! In fact it is a type of code called CSS. When we first introduced text formatting in section 2.3 we never metioned this! But since we are doing more advanced things with HTML it is worth introducing it now as "style" is far more powerful than using<FONT>tags. All the one in the example above does is tell the browser to use a font-size of 8pt and a font colour of white for any text that appears within the<TD>and</TD>tags. If you look at the psychadelic table, you'll see that's exactly what it does! However, you could simply have used a<FONT>tag just after the<BR>tag before the "Aligned top and centred, remembering to put the closing</FONT>tag at the end of that text and it would still work. But I thought it would be fun to introduce something new at this stage!
3. Other useful attributes
Have a look at row 162 on the code screenshot above and at row 170. You will see two hitherto undealt with attributes: "colspan" and "rowspan". What do these do?
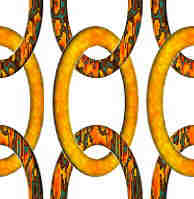
COLSPAN="....": Simply tells the browser to make the cell "jump" into the next or more cells in that row - so that in effect the cell spans more than one of the cells above and below it. The best thing is to look at the psychadelic table - note the text that says "Coulndn't think what stuff to put in here" on the green background extends the width of the two columns above it. That was done by using...colspan:"2"in the<TD>tag that you want to extend. If you do that, then you do not in the next<TD></TD>cell tag, or the next one and the next one if you are extending the colspan further - obviously limited by how many cells you set in the first row of your table! If you had three cells as does my table, putting...colspan:"4"in the first or any other tags will just be silly, as would putting any sort of...colspantag in the last cell! Note also the "Art Gallery" graphic on the row below. That one extends along all the three cells in the table. You guessed it, simply done by adding...colspan:"3" to the first<TD></TD>cell tag - then not having any other cell tags in there at all!ROWSPAN="....": Just like the above, it just tells a cell to span more than one row. Check out the graphic of the chain links on the psychadelic table earlier. See how to the left of it are in fact four cells, not just two? This is because we have told the browser to insert the chains graphic so that it spans two rows. You guessed it, you simply insert a...rowspan:"2"in the<TD>to get it to do that.
Now have a look at row 159 - see the "NOWRAP" attribute? What about that?
NOWRAP: Simply gets inserted into a cell or a row element to keep text all on one line and prevent it thus from wrapping.
4. Putting stuff in the table
You should see by now that all you do is make sure that any link, image or other thing is always placed between the <TD>INSERT THING HERE</TD>
tags. You can refer to the sections about "linking to stuff" and "inlining images" to remind you how to do this and you will be able to see how I have done it from
the screenshot code earlier and how this shows up in the actual psychadelic table.
A thing that catches people out is use of <BR> tags in a table which you will sometimes find you need to do. Don't place them anywhere unless they
are within a cell, i.e. between <TD> </TD> tags. I have seen people try to place them after a </TD> or before or after
a row tag - it just won't work! Have a look at my code screenshot and you will see, for example, that rows 145 and 162 have <BR> tags - otherwise the text would
have started alongside the graphic rather than appear below it. See how they are always somewhere relevant(!) within the <TD> </TD> tags?
Nested Tables
The best way to look at this is to view source of this page and count the number of incidences of <TABLE...> that you see. You should be able to count
a total of four of them! Then have a look at how they are placed and that will give you a good idea of what nested tables are all about. See how at the very top of the page I have set a
<TABLE...> right beneath the BODY tag? This is the master table and contains all others - if you scroll to the very bottom of the code page you will see the closing TABLE tag
on line 416. This master table is what sets the menu table to be on the left of the page, and the text table (that has the white background upon which this text appears) alongside it lying on
a black background. This all directly links back to what I said in the introduction to this section above, about tables being the most fundamental building-block of an HTML page from a
design perspective (as opposed to a coding perspective) - used to position sections of a page.
So, all you have to remember to do when nesting tables is making sure the table you want to nest is within a <TABLE>, <TR>
and <TD> tag and is surrounded by the closing </TD>
, </TR> and </TABLE> tags
(in that order) - simple as that! Obviously the attributes you use will be important. If you are using a master table, you will likely want its width to be 100% otherwise things will start to
be weird!
One of the ways you can learn about nested tables, like this page, is to actually save the code behind this page to your hardrive, then delete all the text between lines 116 and 400 - you will then be left with the raw code template for this page, minus all the text (but the table menu on the left will still be there for you to learn from). Then you can tweak the code to see what it does in your browser!
Useful Hints & Final Thoughts
It is worth talking a bit more about the WIDTH attribute that can be used on both the main <TABLE> element itself as well as in the
<TD> element because the way I introduced it was rather simplified.
My examples use pixel widths, e.g. WIDTH="30" (where pixel is implied so you don't need to type "px" after
the number). However, you can also use percentages - and you can do this in either the <TABLE> tag and/or the <TD> tags. Where you set
a percentage in the TABLE tag only and not in the <TD> tags, the browser will simply arrange the table so it fits the contents. If you set it in the table tag,
e.g. WIDTH="100%", and if you then set the first <TD> (first cell) to have WIDTH="25%", the second to
have WIDTH="25%" and the third to be WIDTH="50%" then that's what you'll get! Note that the lack of any WIDTH="100%"
attribute in the TABLE tag results in the browser assuming the default - which is a table that is the width of 100#37; of the viewable area of the browsser window - or a table that is the width
of the contents of the first row of <TD> tags - whichever is the lesser. That means you don't necessarily have to put a width attribute in the table element at all. Percentages are extremely powerful because they enable a table
to be the same size as the viewer's browser window. That means that if the table width is set to, say, WIDTH="80%" then the table will fit on 80% of
the window whether you are viewing on a small laptop screen or on a large desktop! This is called relative sizing. Actual sizing uses pixels as I have used, e.g.
WIDTH="120" as I have used means that the table (if it were used in the table tag) or the cell (if used in the TD tag like I have done) will always only ever
be 120 pixels wide no matter which resolution (the amount of pixels your screen displays) you are using. This can be dodgy because if you are coding for people with small devices that only
have a small resolution, several cells of 120 pixels wide in a row can mean that the user has to scroll along - which can be annoying. Conversly, if the user viewing your web page has a nice
big MAC widescreen, such a table could look very small indeed! The best thing to find out about table widths is simply play with the code!
The best thing to do with tables is just to get stuck right in there! If I were you, I would set up a basic HTM page in Notepad (or other text editor) and just have a
play around having printed off this page first! If you want to design your own table, I would strongly recommend drawing it on a bit of paper as you want it to appear on the web page. The firt
row you mark "TR1", the second "TR2" and so on. Then you can split the rows up how you want, using "TD1" for the first cell, "TD2" for the second cell,
and so on. Then when you come to code it up, you need to make sure that there are the same number of "TR" tags that are on your bit of paper and the same number of "TD" tags
within each "TR" tag - then don't forget to close each of the cell tags using </TD> and finally close each row with </TR>
otherwise it just won't look proper on the page by whatever tags you have missed!
As you learn, an additional thing you will pick up - along with knowledge - is that you will begin to develop a neat WYSIWYG (What You See Is What You Get) editor in your head! What I mean by this is that you will then be able to "visualise" what the result of your coding will be, without having to keep loading your htm source file into a browser continually, in order to see the effect your coding has had! Not only does this save time, but when you develop that ability, you will know for sure that you have become a "proper" HTML propellerhead! And if you happen to end up doing web design for a friend - or even professionally - it don't half look good to clients if they say "what would X look like" and you can quickly code it up in front of them and then load it into the browser and "wham"! Good luck, and have fun!
NEXT: Are you being framed....?
 |
 |
 |


 © 1998-2009